
Are you looking To give your kitchen faucet A makeover Or replace A worn-out handle? Learning how To remove the handle from A kitchen faucet is A fundamental DIY skill that Can save you time And money. Whether you’re dealing with A loose handle, Or a leak, Or simply want To update your kitchen’s look, This step-by-step guide will walk you through the process. With the right tools and A little know-how, You Can easily tackle this project without the need For professional assistance. In this article, We’ll provide clear instructions, Ensuring a stress-free experience.
What Types Of Kitchen Faucets Handle
Kitchen faucet handles come in all sorts Of designs To meet the varying needs And aesthetic preferences Of homeowners. Single-handle faucets feature sleek designs with one-handed levers For seamless one-handed control over water temperature And flow. While dual-handle designs provide separate hot And cold handles, Enabling precise temperature adjustments. Furthermore, pull-down And pull-out handles come equipped with extendable spray heads, Making tasks such As filling pots easier. Wall-mounted models offer space-saving solutions As they’re installed above the sink.
Gather Your Tools
- Adjustable wrenches
- Screwdriver (Phillips or flat-head)
- Plumber’s tape
- Cloth or towel
Shutting Off The Water Supply
Shutting off the water supply is absolutely necessary before beginning any kitchen faucet handle removal project. Locate and turn clockwise right to fully close off water shut-off valves positioned beneath your sink. These usually connect directly to your faucet – before closing them completely with a quick turn clockwise. This action will stop all flow Into your faucet And prevent leaks Or spills during the removal process, As well As any messes Or leaks during the removal process. It’s a straightforward yet essential step, Which ensures an easier, Less messy project, Always double-check that water has been shut off prior To proceeding with further steps of the kitchen faucet handle removal project.
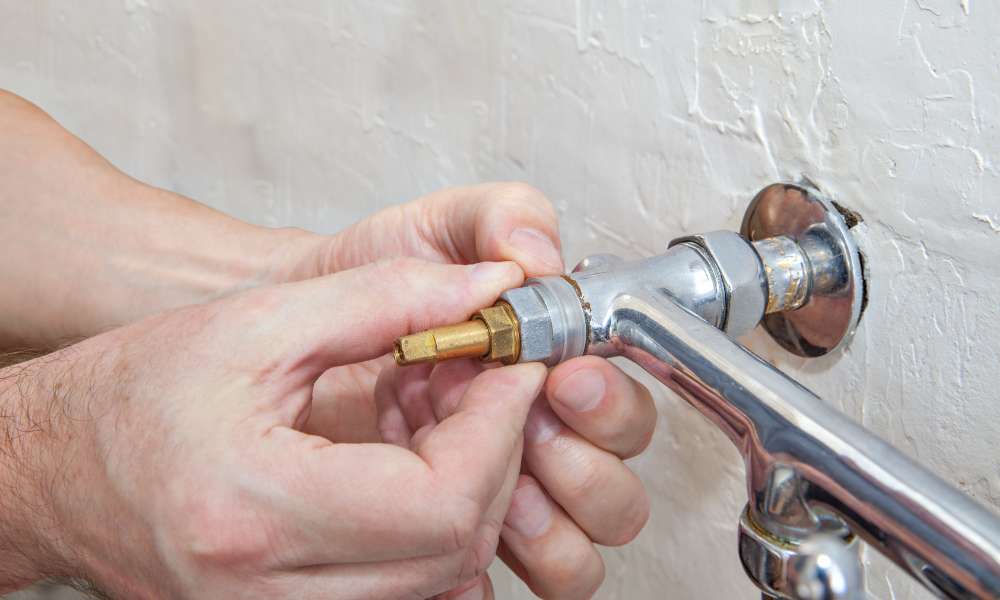
Locating The Set Screw
Step two requires finding the set screw, Usually found hidden underneath a decorative cap or cover on the handle. A button or plug may help reveal it; once exposed, look for it underneath for its location; this may differ depending on which make and model of faucet it belongs to. Be patient as searching thoroughly will bring results – set screws are critical components in the removal process!
Loosening And Removing The Set Screw
Gently turn An appropriately-sized screwdriver counterclockwise To loosen the set screw. Be careful not To apply too much force As excessive force may damage either the set screw Or handle, Which should then Be extracted. Keep the extracted set screw safely stored As it will be needed during assembly. Taking this step allows you To take the next step and take off your handle. Thus taking one step closer To performing faucet maintenance Or replacement tasks.
Rinse Off Mineral Deposits
Removing mineral deposits Is essential in maintaining plumbing fixtures such As faucets and showerheads, Due to hard water. Mineral deposits caused by hard water minerals can obstruct water flow while diminishing the aesthetic appeal Of these fixtures, So regular removal should Be performed. A simple yet effective solution For deposit removal involves mixing white vinegar with water. Soak a cloth Or paper towel in this mixture before wrapping around the affected area until mineral buildup dissolves. Then thoroughly rinse the fixture To eliminate any remaining residue.
Detaching The Handle From The Faucet
Once the set screw Has been loosened And removed, Carefully lift the handle away from the faucet’s body. Mineral deposits Or corrosion may impede this process, To remedy these obstacles, Apply penetrating lubricant. When you successfully dislodge it from its connection to the faucet body, you will gain access to its inner components for maintenance or replacement. But as you undertake this process, be cautious to preserve both parts and ensure a seamless progression to subsequent stages of your plumbing project.
Inspecting And Cleaning The Handle
Once detached from A faucet handle, It’s best practice To conduct A comprehensive examination of its condition. Check for signs Of cracks Or wear that might necessitate repairs Or replacement, Then clean To remove dirt And grime. Mineral deposits As soapy warm water soaks can help dislodge residue accumulated over time while soft brushes. Or cloth can gently scrub off the debris left behind white vinegar mixed with water Can also work effectively For mineral deposits. Conducting regular inspections and cleanings Of handles not only ensures their appearance. But also longevity And smooth operation ensuring its appearance while prolonging their longevity And smooth operation ensuring longevity And smooth operation As well.
Tips For Kitchen Faucet Handle Removal
First, always disconnect the water supply by closing off valves under the sink to avoid accidental leaks. Gathering tools such as adjustable wrenches and a screwdriver that fits correctly to the set screw correctly are essential tools. Take your time to identify this set screw – often hidden by decorative caps – before loosening it gently to avoid damage to other parts or structures. If the handle becomes stuck due to corrosion or rust, applying penetrating lubricant might help. When finished removing, inspect it for damage before cleaning thoroughly before placing all screws and parts back where you keep them for later reassembly process – these tips guarantee successful kitchen faucet handle removal for maintenance, repair, or replacement projects.
Conclusion
Unscrewing a kitchen faucet handle can Be an easily manageable DIY task with the proper tools And knowledge. Start by turning off the water supply To avoid potential leaks, Then loosening And loosening set screws before gently detaching And detaching handles as instructed above. Then inspect And clean any damaged Or buildup off handles prior To detachment Or attachment Of new handles for maintenance, Repairs, Upgrades, etc.