
Have you ever looked up At your ceiling And felt something was missing? That’s a common sentiment among homeowners who crave A touch Of modernity And ambiance in their living spaces. The solution? LED light strips. This innovative lighting option not only brightens up your room But also adds a flair Of sophistication And style. In our blog post titled “How To Install LED Light Strips On Ceiling,” we promise to guide you through the simple yet transformative process Of adding this elegant lighting feature To your home. Get ready To turn those dull ceilings into A vibrant display Of light And color with our easy-to-follow steps.
Types of LED Strip Lights for Ceilings
When opting LED strip lights for your ceiling, the variety available can be relatively astounding. From the pictorial, color- changing capabilities of RGB strips that can produce a dynamic atmosphere, to the understated fineness of single- color strips that give a harmonious and tranquil gleam, there is a type to suit every mood and design preference. Smart are another popular choice, offering the convenience of control via smartphone apps or voice commands, perfect for tech- expertise individualities seeking ultramodern home results. This choice not only affects the aesthetic of your space but also the functionality, as different types of can serve colorful purposes, from accentuation lighting to full room illumination.
What You’ll Need
- Ladder
- Measuring Tape
- Scissors or a Sharp Cutting Tool
- Screwdriver
- Wire Strippers
Choosing the Right Lights
Opting for the right lights for your ceiling involves considering the room’s size, the asked brilliance, and the overall air you wish to produce. Brilliance, measured in lumens, should be chosen grounded on the quantum of light needed in the room. A bedroom or Chesterfield may profit from softer, warmer lights, while a kitchen or study might need brighter, cooler lights. The color temperature, ranging from warm unheroic to cool blue, greatly influences the mood and sense of the space. also, the length of the should be matched to the size of your ceiling, icing acceptable content without excess.
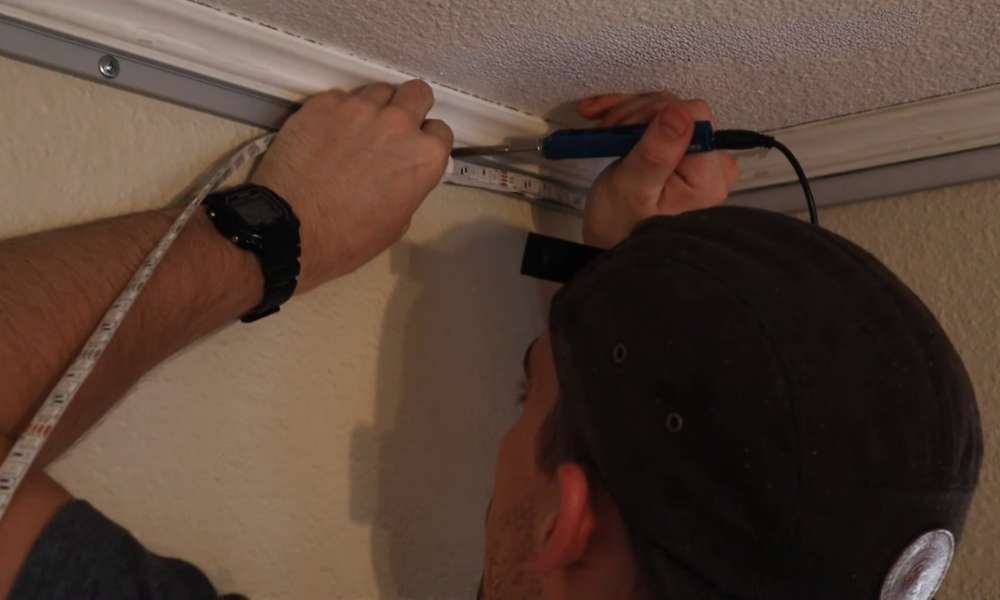
Wiring and Mounting the Lights
Wiring and mounting LED strip lights is a task that requires perfection and attention to detail. First, relating a suitable power source is pivotal. It should be fluently accessible and able to handle the cargo without overfilling. Once the power source is sorted, the next step is to cut the strip light to the required size. utmost LED strips come with pronounced points for a safe slice, allowing for customization to fit your specific ceiling confines.
Finding the Power Source
The first step in your LED strip light installation is to detect a suitable power source. This is a pivotal part of the process, as the power source must be dependable and able to handle the electrical cargo of the lights. immaculately, you will want to choose a power outlet that is close to where you intend to install the lights to minimize the need for expansive wiring.
Cutting the Strip Light to Size
Once you have your power source sorted out, the next step is to customize the length of your lights to fit your ceiling impeccably. utmost LED strips come with cut marks at set intervals, allowing you to trim them without damaging the factors. It’s vital to measure your ceiling space directly and plan where each strip will go. also, using a brace of sharp scissors or a suitable slice tool, precisely cut the strip along the designated line. This customization ensures that your light installation looks neat and professionally done, fitting your space like a glove.
Removing the Adhesive Backing
After cutting the strips to the required length, the next step is to prepare them for installation. This involves removing the tenacious backing that comes with the utmost LED strips. The glue is designed to be strong and durable, ensuring that the strips stay securely attached to the ceiling. Before shelling off the backing, ensure the face of your ceiling is clean and free from dust or debris, as any patches can weaken the glue’s grip.
Sticking the Lights to the Ceiling
Mounting the LED strips is where your design starts to come to life. Begin by situating the strips on the ceiling according to your planned layout. Press the strips forcefully against the face, starting from one end and sluggishly working your way to the other. Be sure to smooth out any air bubbles or crimps as you go. This step requires a bit of tolerance and perfection to ensure that the strips are straight and unevenly spaced. The strong glue should keep the strips securely in place, but in the case of a lower-than-ideal ceiling face, fresh mounting clips or glue may be necessary.
Connecting the Power Supply
The final step in your light installation is connecting them to the power force. This is a critical stage where safety is consummated. ensure that the power force is turned off before making any connections. Attach the end of the to the power force, following the manufacturer’s instructions closely.
However, if your setup includes a dimmer or a regulator for color-changing strips, make sure you connect these correctly. Once you’ve connected everything, turn on the power source and test the lights. If all goes well, your newly installed LED strips will beautifully illuminate your ceiling, bringing new energy and ambiance to your space.
Maintenance and Troubleshooting
Regular cleaning and conservation will keep your light strips shining brightly and protract their lifetime. Dust and debris can accumulate over time, so gentle cleaning is recommended. However, common problems like fluttering or unresponsive strips are frequently easy to troubleshoot, If you encounter any issues. Checking connections, power force, and remote control settings can resolve the utmost issues.
Conclusion
Take a step back And enjoy the transformation your light strips have brought To your space. The right lighting can turn An ordinary room into something extraordinary. We encourage our readers to share their experiences and photos of their light strip installations. Your journey from planning To completion can inspire others And showcase the incredible impact Of well-executed LED lighting in home décor.